¶ Roku Device Activation (Before adding Citadel)
¶ Background
After you connect and power on your Roku streaming player or Roku Streaming Stick, the setup procedure for both devices is essentially the same. This document describes the basic setup instructions you can use for any Roku player or Streaming Stick.
Note: If your Roku device supports 4K Ultra HD (4K UHD) or High Dynamic Range (HDR), you will not be able to take advantage of 4K UHD without a 4K UHD-compatible TV, or HDR without an HDR-compatible TV. In addition to a compatible TV, there are several other requirements you should be aware of when setting up your Roku device for 4K UHD or setting it up for HDR.
If you prefer a more tailored set of instructions, you can visit the setup article specific to the current-generation models listed below.
¶ How does my Roku device connect to my TV?
Your Roku streaming device can be connected to any television with an HDMI® port. To make this connection, a Roku player requires an HDMI cable while a Roku Streaming Stick connects directly with its built-in HDMI connector. When selecting an HDMI cable, we recommend that you use a High-Speed HDMI Cable if your TV only supports 720p and 1080p, or a Premium High-Speed HDMI Cable if your TV also supports 4K Ultra HD or HDR.
¶ What if my TV does not have an HDMI port?
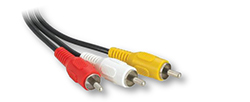
If you have an older television that does not support HDMI, you can connect a Roku player that has a composite audio/video connection in addition to its HDMI connection. To determine if your player has this connection, look for a single port labeled "A/V" or "A/V OUT", or you may see a separate port labeled "VIDEO" along with two ports labeled "AUDIO".
The cable you need to connect your player to your TV likely has red, white, and yellow connectors like those seen below.
¶ Setting up your Roku device
Use the steps below to connect your Roku streaming player or Roku Streaming Stick and prepare it for on-screen setup and activation.
¶ 1. Connect your Roku device to your TV
Using HDMI
Connect your Roku player using the correct HDMI cable, or connect your Streaming Stick directly

Note: Your Roku player or Streaming Stick may differ from those depicted in the sample diagrams here.
Note: If your Roku Streaming Stick does not easily connect to the HDMI input on your TV due to space restrictions, you may wish to get a free HDMI extender cable.
¶ 2. Connect your Roku player to your wired network (optional)
If you are using a wired network and your Roku player has an Ethernet port, connect one end of an Ethernet cable to your player and the other end to an available Ethernet port on your router or network switch.
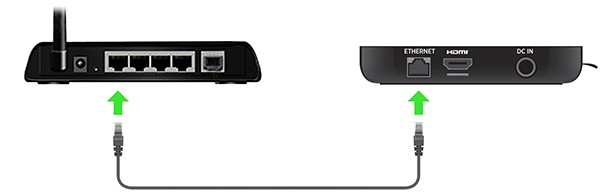
Note: A Roku Streaming Stick does not have an Ethernet port.
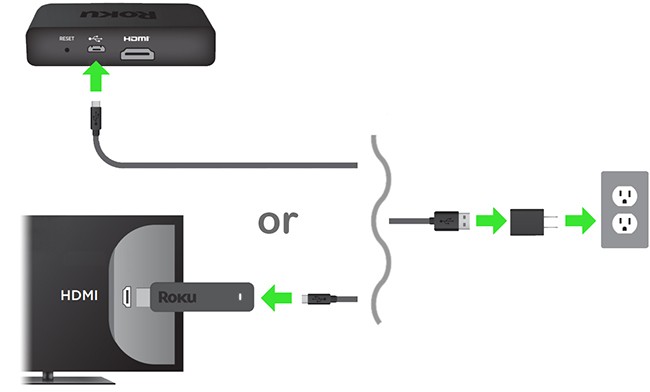
¶ 3. Connect your Roku device to power
From a wall outlet (recommended)
Use the power adapter (or USB power cable and power adapter) to connect your Roku streaming device to a wall outlet.
Note: If you are connecting a Roku Streaming Stick+, you must connect the USB power cable with an advanced wireless receiver along with the USB power extender cable before attaching the power adapter. For details, refer to the setup article specific to the Roku Streaming Stick+.
Note: The USB port on some TV’s may be unable to power a Roku device. If you see the on-screen warning message that appears in these cases, use the power adapter (or USB power cable and power adapter) and connect to a wall outlet.
¶ 4. Power on your TV and select the correct input
Use your TV remote to power on your television and select the input where you connected your Roku device. You should see the Roku logo on the TV screen as your Roku device powers on. Help is available if you do not see any picture on your TV.
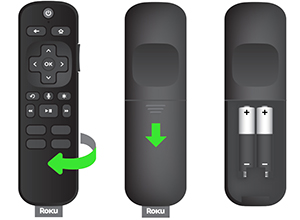
¶ 5. Insert batteries in your Roku remote
Slide open the battery cover on the backside of your remote and insert batteries.
Whether you have a standard IR remote or a Roku enhanced "point-anywhere" remote, help is available if you need to:
¶ On-screen setup and activation
- Choose a language
- The first screen you see will allow you to choose a language. All text and dialog within the Roku interface will be displayed in the selected language.
- Scroll up and down the list and press the OK button on your Roku remote to choose a language.
Note: It is the responsibility of the channel provider to translate their channel and some channels may not support your chosen language.
- Connect your Roku device to your network and the internet
If you are using a wired network, make sure an Ethernet cable is connected to your Roku player and then set up the wired connection. Otherwise, use the guidelines below to set up the wireless connection.
- Choose your wireless network from the list of available networks and enter your password. This is most often the same network you use to connect your computer or smartphone to the internet. If you do not see your network, select Scan again to see all networks. For more assistance, see help finding your wireless network and password.
- If you want to see your password as you type, choose Show password. This can help prevent entering the wrong password. Remember, passwords are case-sensitive. Use the shift button on the on-screen keyboard to enter a capital letter.
- Once you have entered your password and selected Connect, your Roku device will automatically connect to the internet. You can get more help if you are unable to connect to your wireless network.
- Wait for your Roku device to download the latest software
- Once connected to the internet, your Roku device will check to see if a software update is available, download the latest version if necessary, and then reboot.
- Once connected to the internet, your Roku device will check to see if a software update is available, download the latest version if necessary, and then reboot.
- Set the display type
- Your Roku device will analyze the HDMI connection to determine the best display resolution so you do not have to manually configure the settings. To change the display type at a later time, go to Settings > Display type.
- If support for 4K UHD or HDR is not detected on your compatible Roku device, and you are using a 4K UHD-compatible TV or HDR-compatible TV, make sure all HDMI cables are firmly attached and all connections support HDCP 2.2. For more help, review the steps for 4K UHD setup or HDR setup.
- Set up your Roku Enhanced remote to control your TV
- Select Check remote settings to automatically set up your Roku Enhanced remote to control the power and volume for your TV. If you skip this step, you can set up your remote at any time from the settings menu. Go to Settings > Remotes & devices > Remote > Set up remote for TV control.
Notes:- This setup step only appears if you are using a Roku enhanced remote with TV power and volume buttons. Select Roku devices released in 2017 and later include this remote.
- The Roku enhanced remote may not be able to control volume and power on all TV models. With some TV models, you may only be able to control the volume, and not the power.
- Select Check remote settings to automatically set up your Roku Enhanced remote to control the power and volume for your TV. If you skip this step, you can set up your remote at any time from the settings menu. Go to Settings > Remotes & devices > Remote > Set up remote for TV control.
- Create a Roku account and activate your Roku device
- In order to activate your Roku device, it must be linked to a Roku account. Your Roku account keeps track of which Roku devices you own and allows you to add free and purchase channels from the Roku Channel Store.
- Note: There is NEVER a charge to create a Roku account.
- Note: There is NEVER a charge to create a Roku account.
- Instructions for activating your Roku device will be displayed on your TV, including an activation code; e.g. “XCV5TG”. You will be required to visit roku.com/link on your computer or smartphone, enter the code and follow the instructions to activate your Roku device.
- Note: Roku does NOT charge for device activation. When entering roku.com/link into your web browser, type it carefully to avoid fraudulent websites.
- Note: Roku does NOT charge for device activation. When entering roku.com/link into your web browser, type it carefully to avoid fraudulent websites.
- In order to activate your Roku device, it must be linked to a Roku account. Your Roku account keeps track of which Roku devices you own and allows you to add free and purchase channels from the Roku Channel Store.
- You are done!
- Once you have completed all the activation steps, your Roku streaming player or Roku Streaming Stick is ready to use.
¶ Downloading Citadel on Your Roku
- From your Roku home screen press the Left Button on your remote.
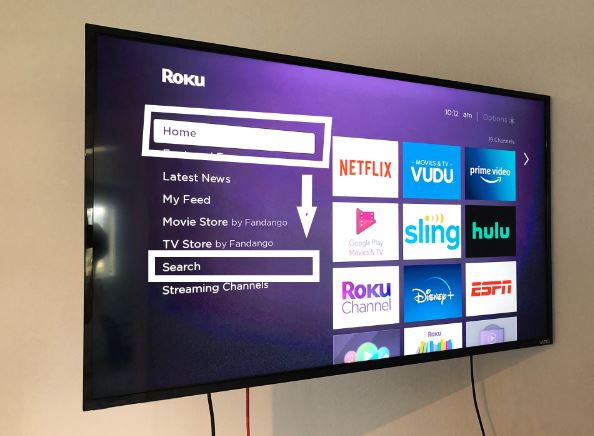
- Select Search
- Enter Citadel then location and select the Citadel app.
PHOTO HERE WHEN AVAILABLE
- Select Download Channel (Note: in some cases, Citadel is already downloaded. In this case, it will say Go to Channel rather than Download).
PHOTO HERE WHEN AVAILABLE
- Enter the Citadel PIN for the screen you are setting up. (Provided to you upon sign up or can be found on the Screens tab on your Citadel instance)
PHOTO HERE WHEN AVAILABLE
- Click on the locations (screen you are setting up) icon after you enter the Citadel Pin. Your content should now begin playing.
PHOTO HERE WHEN AVAILABLE